Effortless Holiday Dessert: Master 3-Ingredient Eggnog Crème Brûlée
As the festive season draws near, the tantalizing aroma of holiday spices fills the air, and thoughts turn to joyous gatherings and, of course, delicious desserts. While some holiday treats demand hours in the kitchen, imagine presenting a show-stopping, gourmet-sounding dessert that required minimal effort and just three core ingredients. Enter the enchanting world of eggnog crème brûlée – a seasonal twist on a classic that is surprisingly simple to perfect.
This isn't just another dessert recipe; it's a holiday hack that delivers maximum impact with minimal fuss. Forget complex ingredient lists or intricate techniques. With the magic of eggnog, you're just three steps away from a velvety, spiced custard crowned with that irresistible caramelized sugar crust. Whether you're hosting a grand feast, contributing to a potluck, or simply craving a taste of holiday luxury, this simple eggnog crème brûlée with a shortcut is your secret weapon, promising rave reviews and an incredibly satisfying crunch.
Why Eggnog Crème Brûlée is Your Holiday Dessert Game-Changer
The words "crème brûlée" often conjure images of professional chefs and complicated culinary feats. Yet, this eggnog crème brûlée recipe shatters that illusion, proving that sophistication can indeed be effortless. It’s the ultimate holiday dessert for several compelling reasons:
- Astonishingly Easy: The biggest draw is undoubtedly its simplicity. By leveraging eggnog as a pre-sweetened, pre-spiced base, you bypass the need for separate cream, sugar, and flavorings, drastically cutting down on preparation time and effort.
- Gourmet Appeal: Despite its ease, the final product is undeniably elegant. The contrast between the silky, spiced custard and the crisp, caramelized sugar topping creates a textural and flavor experience that feels luxurious and impressive.
- Make-Ahead Marvel: Holidays are busy. This dessert is designed to be made a day in advance, freeing up precious time and valuable oven space on the day of your celebration. Simply chill the custards overnight and brûlée them just before serving for that fresh, crackling crust. This make-ahead capability also makes it your easy potluck dessert dream.
- Travels Well: For those potlucks or dinner parties at a friend's house, individual ramekins of crème brûlée are incredibly convenient to transport.
- Naturally Gluten-Free: A fantastic option for guests with dietary restrictions, this dessert is naturally gluten-free, ensuring everyone can indulge in its festive deliciousness.
- Versatile Serving Options: Whether you prefer individual portions in charming ramekins or a grand, family-style dish perfect for sharing, this recipe adapts beautifully to your serving preferences.
This recipe isn't just about making a dessert; it's about making your holidays easier, more delicious, and undeniably more impressive without breaking a sweat.
Unlocking the Magic: The Core 3 Ingredients & Why They Work
The brilliance of this eggnog crème brûlée lies in its minimal yet mighty ingredient list. Each component plays a crucial role in creating the rich, creamy texture and signature caramelized finish.
1. Eggnog (32 oz container)
This is your star ingredient and the ultimate shortcut. Traditional crème brûlée requires heavy cream, sugar, and often vanilla or other flavorings. Eggnog, however, comes pre-packaged with all these elements. It's already sweetened to perfection, infused with classic holiday spices like nutmeg and sometimes cinnamon, and its rich, dairy base provides the ideal foundation for a velvety custard. When choosing your eggnog, opt for a good quality, full-fat variety for the best richness and flavor profile. Thicker eggnogs will yield a more luxurious final product.
2. Egg Yolks (8 large)
Egg yolks are the binding agent and the key to the custard's luxurious texture. When gently heated, the proteins in the yolks coagulate, transforming the liquid eggnog into a smooth, thick, and jiggly custard. They contribute to the characteristic pale yellow hue and the incredibly rich mouthfeel. Don't be tempted to use whole eggs; the whites would create a firmer, more rubbery texture, straying from the desired creaminess of crème brûlée. Save those whites for a healthy post-holiday omelet!
3. Granulated Sugar (approx. ½ cup for topping)
This is where the "brûlée" magic happens. A thin, even layer of granulated sugar sprinkled over the chilled custard, then caramelized with a culinary torch, creates that iconic, shatteringly crisp topping. The intense heat from the torch rapidly melts and browns the sugar, forming a thin, glassy crust that cracks beautifully when tapped with a spoon. While granulated sugar works perfectly, some prefer turbinado sugar for a slightly coarser texture and deeper caramelization, though it may take a little longer to melt.
Optional Enhancements:
While the three core ingredients deliver perfection, you can subtly enhance your eggnog crème brûlée with a few optional additions:
- Spices: A pinch of ground cinnamon or pumpkin spice added directly to the eggnog mixture before heating can deepen the holiday flavor profile.
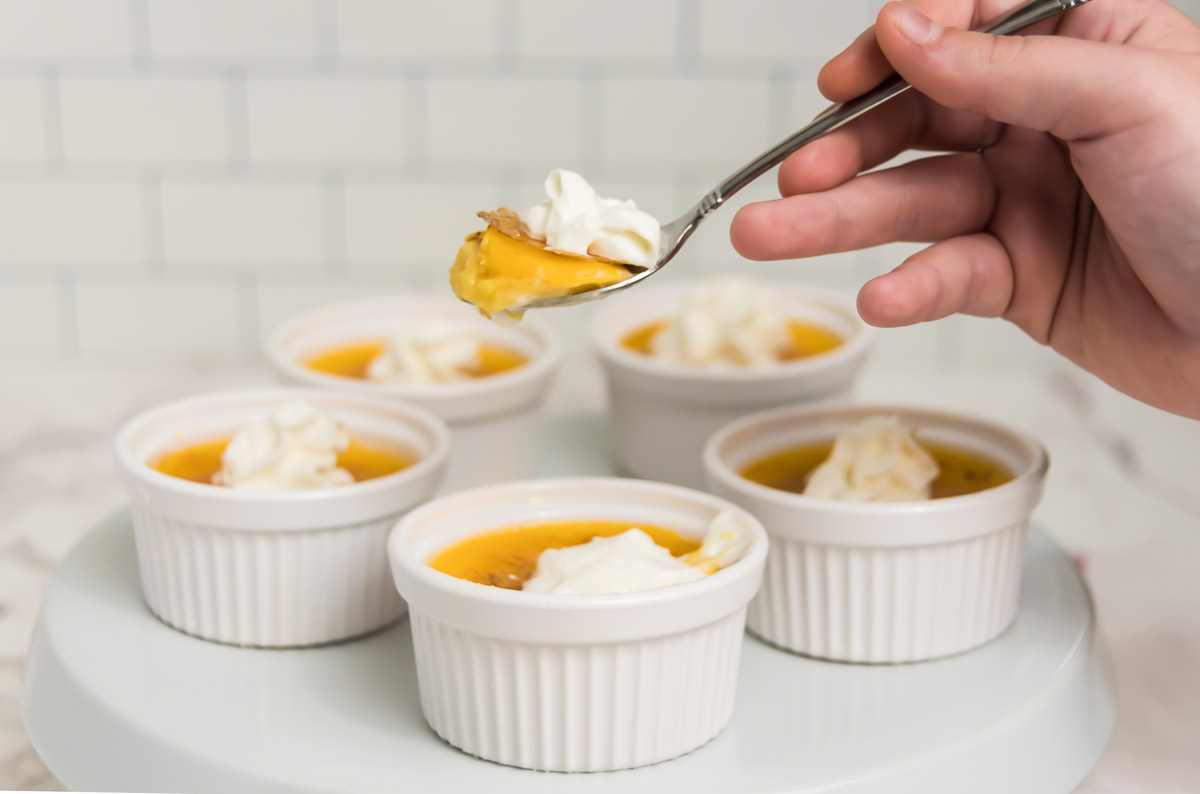
- Whipped Cream: A dollop of freshly whipped cream provides a cloud-like contrast and extra richness.
- Fresh Berries: A sprinkle of fresh raspberries or sliced strawberries can add a burst of color and a touch of tartness to cut through the richness.
Essential Equipment for a Perfect Eggnog Crème Brûlée
Having the right tools makes the process even smoother and ensures a professional-looking result.
- Culinary Torch: This is arguably the most crucial piece of equipment for achieving that signature brûléed crust. It provides direct, intense heat to caramelize the sugar quickly and evenly without heating the custard underneath. If you don't have one, a broiler can be used with extreme caution (more on that below).
- Stand Mixer (or Hand Mixer): While vigorous whisking can work, a stand mixer with a whisk attachment makes quick work of beating the egg yolks to the desired pale, fluffy consistency.
- Ramekins or a 1.5-Quart Baking Dish: For individual servings, 8-10 six-ounce ramekins are ideal. If you prefer a family-style dessert, a 1.5-quart baking dish (such as an 8x8 square or a similar oval dish) works beautifully.
- Large Baking Dish (for Water Bath): You'll need a larger roasting pan or baking dish with high sides to create a water bath (bain-marie) for the custards. This ensures gentle, even cooking.
- 2- or 3-Quart Saucepan: For gently heating the eggnog without scorching.
- Fine-Mesh Sieve (Optional but Recommended): For straining the custard mixture before baking, ensuring an incredibly smooth, lump-free texture.
Your Step-by-Step Guide to Irresistible Eggnog Crème Brûlée
Making this delightful dessert is a straightforward process. Follow these steps for a perfectly creamy custard and a crisp, caramelized topping every time.
- Prepare Your Workspace: Preheat your oven to 300°F (150°C). Arrange your ramekins (or baking dish) in a larger, high-sided baking pan. Set a kettle of water to boil for the water bath.
- Gently Heat the Eggnog: In a 2- or 3-quart saucepan, pour in the eggnog. Heat it over medium-low heat, stirring occasionally, until it's steaming and almost simmering. Crucially, do NOT let it boil, as this can cause the dairy to curdle or scorch. Just a gentle warmth is what we're aiming for.
- Beat the Egg Yolks: While the eggnog heats, place the 8 egg yolks in the bowl of your stand mixer. Beat them on medium-high speed until they are pale yellow and slightly thickened, about 2-3 minutes. This aerates the yolks and helps create a smoother custard.
- Temper the Yolks: This is a vital step to prevent scrambling the eggs. With your mixer running on low speed, slowly and steadily pour about half of the hot eggnog into the beaten egg yolks. This gradually brings the temperature of the yolks up. Once combined, pour the tempered yolk mixture back into the saucepan with the remaining hot eggnog. Whisk gently to combine thoroughly.
- Strain (Optional but Recommended): For the silkiest custard, pour the entire eggnog-yolk mixture through a fine-mesh sieve into a clean bowl or large measuring cup. This removes any potential cooked egg bits or chalazae, ensuring a perfectly smooth texture.
- Fill and Bake: Divide the custard mixture evenly among your ramekins (approximately ½ cup per ramekin, yielding about 8-10 servings) or pour it into your chosen family-style baking dish. Carefully transfer the larger baking pan with the custards to the preheated oven. Once in the oven, carefully pour the hot water from your kettle into the larger baking pan, filling it about halfway up the sides of the ramekins/dish. This water bath creates a gentle, humid cooking environment, preventing the custards from curdling, cracking, and cooking too quickly.
- Bake Until Set: Bake for 40-45 minutes for individual ramekins, or 50-60 minutes for a larger dish. The custards are done when the edges are set, but the center still has a slight, delicate jiggle when gently shaken. They will continue to set as they cool.
- Cool and Chill: Carefully remove the larger baking pan from the oven. Let the ramekins/dish cool in the water bath for about 15-20 minutes, then carefully remove them and transfer to a wire rack to cool completely at room temperature. Once cooled, cover them with plastic wrap and refrigerate for at least 4 hours, or preferably overnight, to allow them to fully set and for the flavors to meld.
- The Brûlée Moment: Just before serving, uncover the chilled custards. Sprinkle an even, thin layer of granulated sugar (about 1-2 teaspoons per ramekin, or enough to lightly cover the surface of a larger dish) over the top. Using your culinary torch, move the flame slowly and evenly across the sugar until it melts, bubbles, and turns a rich amber color. Be careful not to burn it. If using a broiler (as a last resort), place the custards on a baking sheet on the top rack of your oven, about 4-6 inches from the heat. Broil for 1-3 minutes, watching constantly, until the sugar is caramelized. This method carries a higher risk of overheating the custard.
- Serve and Enjoy: Once the sugar is caramelized, serve immediately to enjoy that delightful contrast of warm, crisp topping and cold, creamy custard. Garnish with whipped cream, a sprinkle of cinnamon, or fresh berries if desired.
Expert Tips for Your Best Eggnog Crème Brûl��e Yet
Achieving crème brûlée perfection is within reach with these additional insights:
- Choose Quality Eggnog: The better your eggnog, the richer and more flavorful your custard will be. Look for full-fat options for optimal creaminess.
- Room Temperature Yolks: Allow your egg yolks to come to room temperature before beating them. They'll mix more smoothly and incorporate air better, leading to a silkier custard.
- Don't Rush the Tempering: Slowly adding the hot eggnog to the yolks is critical. Pouring too quickly will scramble the eggs. Patience here is key to a smooth, lump-free mixture.
- The Water Bath is Essential: Never skip the water bath (bain-marie). It insulates the custards, preventing them from baking too quickly and cracking, ensuring an even, gentle cook and a perfectly smooth texture.
- Chill Time is Non-Negotiable: Adequate chilling allows the custards to fully set and firm up, enhancing their texture and flavor. Don't rush this step.
- Brûlée Just Before Serving: For the most satisfying "crack" and fresh caramel flavor, always brûlée the sugar immediately before you plan to serve. If left to sit, the caramelized sugar can absorb moisture and become sticky.
- Even Sugar Layer: When applying the sugar for brûléeing, aim for an even, thin layer. Too much sugar can result in a thick, hard layer that's difficult to crack.
- Torch Technique: Keep the flame moving constantly and evenly over the sugar. Don't hold it in one spot for too long to prevent burning.
- Flavor Variations: Beyond the basic, consider adding a tiny splash of rum extract or a grating of fresh nutmeg directly into the custard mixture before baking for an even deeper, more complex eggnog flavor.
Conclusion
This 3-ingredient eggnog crème brûlée recipe truly embodies the spirit of effortless elegance, transforming a beloved holiday beverage into a dessert that looks and tastes incredibly sophisticated. It's a testament to how simple ingredients, combined with a clever shortcut, can yield results that impress even the most discerning palates. Whether you're a seasoned baker or a holiday novice, this recipe empowers you to create a memorable, naturally gluten-free treat that saves you time and oven space during the busiest season. So go ahead, embrace the festive flavors, perfect that satisfying crack, and watch your guests delight in this irresistible holiday indulgence.
